I made some Christmas tree cones this past weekend. This project has only been on my to-do list for two years now-that's right, put a BIG FAT check mark next to that. For those of you who don't live under rocks you know there's a bajillion variations of these tree cones all over the place-both in stores and on Pinterest. I love them and they were even featured in my Crush of the Month series last December. So I was super excited that Baby B actually allowed me some time this past weekend to whip up a few of my own {as I am sure you have noticed the crafty drought over here lately!}.
I made two different types of trees.

I started off by cutting and rolling my poster board into a cone shape. You can Google "tree cone template" and find a slew of templates to guide you on how to cut your poster board. Now I admit this was probably the most difficult part of this project because it involved some very basic geometry but I promise if I was able to figure it out then you can too! You can buy premade cones at the craft store but making them yourself with poster board from the Dollar Store can save you some moolah.
I used box tape to hold them together-hot glue would work too.

For my first tree, I wrapped the cone in some red polka dot wrapping paper and then wrapped the top half with some sisal rope twine-hot gluing the twine here and there.
This was inspired by a tree I saw on a recent trip to Home Goods.

Then I attached a double strand of mini beaded garland {courtesy of Ikea} with some more hot glue.

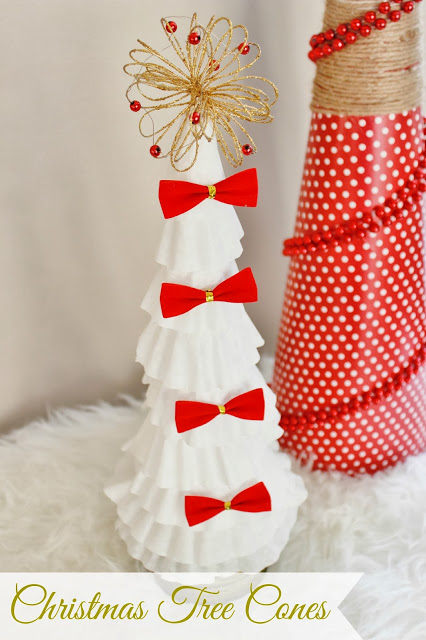
Finally, to top it off {literally} I added one of these spiral-orb-like-ornament-thingamajiggies I stumbled upon at the Dollar Store. I love the festive touch they add to the tree.

Now onto the bow tie tree-which let's face it, if Martha Stewart held a glue gun to my head and asked me to pick a favorite of the two this little guy would win hands down.
Bow tie tree was the littler one of my cones so I really wanted him to be cute and fluffy.
I started off by cutting holes out of the center of a handful of coffee filters.

Then I applied a thin line of hot glue around the inner circle along the edge of the filters and attached them one by one to my trees. The filters cut weren't large enough to fit around the base of my tree so I had to come up with another plan to cover the bottom of the cone. Enter green yarn.
I had some yarn left over from my fall wreath and I think it worked perfectly for a base to my tree.

And then for the grande finale, I topped my little tree off also with an ornament AND then I glued a few holiday bows along the front of the tree.
Bows make everything better. I believe they could even cure world hunger.

Isn't he a cutie pie?


I'm really happy with how they turned out and I kind of want to make like a hundred more of them now. The best part is most of these materials can be found at the Dollar Store or even laying around your house so they're super duper cheap to make!
PS. Sorry for the delay in announcing this BUT Megan Nelson you are the winner of the Dragon Porter jewelry giveaway! I'll be in touch soon so you can claim your prize. Thanks to everyone who participated!

Sharing with friends here:
DIY by Design
Ginger Snap Crafts
Savvy Southern Style
Frugal Girls
Tatertots and Jello
Connect with me: