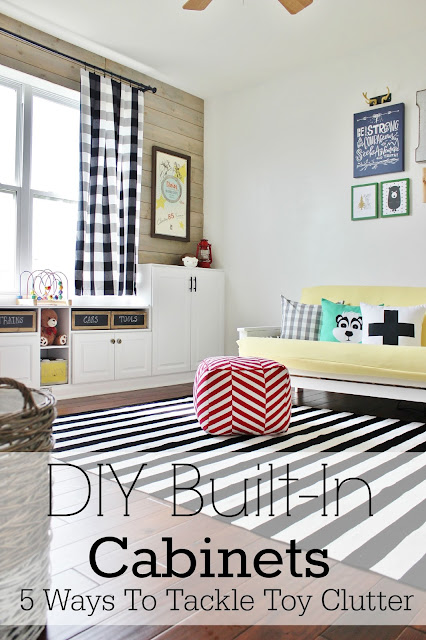
I am deep in the throes of decluttering and decrapifying our basement and thought this would be the perfect time to talk about our DIY playroom built-ins and a few tips on how we finally tackled the toy clutter. Those of you who have little people taking up residency in your home, you know all too well that kid's toys seem to breed overnight. Before you know it, stuff animals, Legos, and books are invading every square footage of your house and I know I'm not alone when I say the clutter can start to drive you batty.
When we first set out on our "office" turned playroom adventures, I had a goal in mind to create a fun, functional, and organizational space for Little B BUT I also didn't want to pour a lot of sweat, blood, and tears into something that was only going to temporarily solve the toy cluttering problem. Isn't it annoying when you clean out your pantry, and one week later the chaos returns?
In order to avoid the same fate for the playroom, I created a few organizational toy rules and I'm happy to say that not only did they save our sanity but approximately four months later these rules are still working for us!
Here are some easy tips on how we did it:
1. Purge
Purge, baby, purge! This is an obvious one but before we moved everything into the playroom, I did a mad clean-sweep of B's toys. Anything he had outgrown or annoyed the hell out of me didn't show any interest in, I packed away and/or donated to Goodwill. Purging on a regular basis is the only way to stay on top of it.
Birthdays and Christmas are a good time to reevaluate the toy situation.
2. Create a 'home' for your toys.
If there's not a designated spot for your children's toys, then they most certainly will just lie around anywhere.
'Homeless' items are almost always the root of every cluttering problem ( my poorly managed mail system is the perfect example of this!) By creating built-ins in a storage-less room, we were able to establish a home for most of our toys and I'll share how we built those in a moment. However, I know not everyone has the means (i.e. space, time, money, etc...) to just throw up some built-ins but you can always assign toys to a closet, baskets, bins, or a free-standing cabinet. The sky is the limit when it comes to all of the creative ways to hide stuff!
3. Rotate
The art of toy rotation has quickly become one of my favorite things to do (Ha! You know you're a parent when these are the type of things that excite you in life!) Kid's (especially toddlers) change their interest like every five seconds. One day it's all about Elmo, the next day it's bubbles. I've designated two storage ottomans as 'homes' for a handful of toys that B isn't currently obsessed with and rotate them out on a regular basis. Any time he stumbles upon his rotation stash, (they're in a room that he doesn't have access to very often) he shows a renewed interest in them as if they're brand new toys he's never seen before. Sucker!
4. Divide and Conquer
So your kid just had a birthday party and now you look like you're running an illegal toy store out of your living room? Divide the toy stash in half; one for current play and one to be stored away to be brought out at a later date. That way they won't get overstimulated or bored with ALL of their new toys at once.
5. Less is More
Speaking of birthdays, it only took me a few months as parent to learn that you really don't need to shower your kids with a ton of gifts and toys....that's what grandparents are for! Kidding, but my point is that after B's first birthday I quickly learned there was no reason why daddy and I HAD to buy him so many toy gifts.
If you know friends and family tend to be REALLY generous gift-givers, then try to be a bit more conservative with your own gift giving habits.
These five things really have made a major difference in curbing the toy clutter!
The double bonus is that we now spend less time in the evenings cleaning up Tornado Toy Alley.
Everything has a home, a place, and I'm feeling sane again.
The playroom built-ins have obviously played the biggest role in this matter so today I'm excited to share with you how we created these bad boys. No carpentry skills? No problem. We were just 2 fools who took on this project not knowing what the heck we were doing either!

Materials Needed :
**Amount of wood and materials will vary depending on the size of your project**
4 hardware store stock cabinets (number can vary by wall size).
2 x 4s
Wood screws
HVAC aluminium tape
Wood shims
Cabinet mounting screws
MDF particle board
Primer
Paint (we took a cabinet door in to our local home store and had them match the color)
2.5 " finishing nails
Shelf pegs
Baseboard
Quarter round
Painter's caulk
Trim wood (optional)
Floor vent register or decorative aluminium sheet
Cabinet hardware (optional)
Tools Needed:
Measuring tape
Prybar
Hammer
Drill
Stud finder
Miter saw
Table saw (optional; can have local hardware store rip your MDF boards)
Nail Gun
Level
Paint brush and roller
Caulk gun
Tin snips (for decorative aluminium sheet, if needed)
Steps:
1) First, take your time to measure out your space and plan out your project. Keep in mind this whole project is built around your cabinets, so carefully prepare their arrangement and spacing. My hubby and I drew up a few sketches on post-it notes to make sure we were on the same page. Don't forget to take into account the height of your cabinets, toe kick, shelves and any windows you may have. We (as in the hubby) did a lot of math to make sure that in the end the top of the cubbies came up just below the window to about a toddler's height.

2) Using a prybar and hammer, gently start to remove the baseboard from the wall. Find and mark the studs on your wall.

3) Once that's complete, it's time to start framing out the platform in which your cabinets will sit on. Please note we used wall cabinets, which are meant to be hung above counter tops. There is an air duct in the space where we installed our built-ins, utilizing wall cabinets allowed for us to build our own base and toe kick in order to accommodate the air duct. Using a miter saw cut your 2 x 4s to create two frames with cross supports; one for the right side of the air duct and one for the left side. Each frame should be the length of your wall up until the edge of the duct. The short cross supports should be spaced out at the length of each of your cabinets, it's essentially the base that each cabinet sits on. We drilled our frames together with wood screws (you may notice we had two cross support beams on the right side and only one on the left, that's because the right side of our wall was slightly longer than the left). IMPORTANT: Do not build the frames to be the full depth of your cabinets, create them about a quarter inch less to allow space for the addition of the toe kick later. This way the cabinets will be flush with the toe kick. Secure the frames to the wall by drilling them into the studs so they won't move.


4) Measure and cut a piece of 2 x 4 to attach the two frames as seen in the picture below. Place it right at the back of your air duct return.


5) In order to create a makeshift air duct, we used HVAC aluminium foil tape and securely taped the wood frame surrounding the open floor vent. This will help the efficiency of your heat and air flow through out the room once the built-ins have been installed.

6) Now it's time to hang the cabinets. First, remove all of the doors. Next you'll want to start screwing your cabinets together. Attach each small cabinet to one tall cabinet and then position them on top of your frames. Walls aren't typically flushed and they could bow a bit, you'll want to make sure your cabinets are connected, leveled, and flushed prior to hanging them. Add wood shims where ever needed. You'll use your level a lot during this part of the project! Once you're sure everything is flushed and aligned, then hang the cabinets to the wall with cabinet mounting screws. Pssst......at this time we reattached the cabinet
doors but I recommend just waiting to hang them back on at the end of the project.. You'll see why later.


7) Measure and cut your MDF particle board to cap off the top of each cabinet. If you don't have a table saw, your local Home Depot may rip the boards for you for a minimal fee. Prime and paint the boards first, and then nail them down with a nail gun.
8) Now it's time to move onto the cubbie. These instructions, at first, may convince you that you've either been hitting the bottle too much today or that you're losing your mind but I promise if you check out the image below it's make a lot more sense! In order to complete this section, you will need to cut 7 more pieces of MDF board. Board #1 is for the top of the air duct, which will help fill in the remaining frame at the base of the cabinets. Boards 2 and 3 are the two vertical pieces in the middle of the cubbie, they are the height of the small cabinets plus what ever you want the height of your finished cubbie to be. Boards 4 and 5 are the two small pieces that will sit on top of the small cabinets but alongside the two large cabinets and will serve as support for the long, top board, which is board # 6. Board 7 will be the small shelf for the vertical part of the cubbie, which for some reason we added last so it's not pictured below but you can see in the final picture. Everything was primed first and then nailed down with the nail gun.

9) To create the toe kick, measure and cut two pieces of baseboard; one for each side of the air duct. Nail the toe kick board to the base of the cabinets with 2.5" finishing nails. **You will also notice the entire inside of the "air duct" is completely taped with the HVAC tape at this point, including the underside of the MDF board that was installed on top of it.

In steps 10 and 11, I'm going to briefly share what the two largest obstacles were that we faced when working on this project and the solutions we came up with. I hope this comes in handy in case you encounter the same problems!
Step 10) Originally, we planned on using quarter round to fill the gap between the cabinets and the wall, but we couldn't find quarter round wide enough to cover it.

We racked our brains for weeks and finally discovered some really soft and thin trim wood at the local hard ware store. Seriously, this stuff is so soft you could cut it with a blade. So if you have the same issue definitely take a field trip to the store to look for different options. Sometimes do-it-yourself projects are all about trial and error! PS. Remember when I recommended not doing as we did and just waiting to the end of the project to reinstall the cabinet doors.....this is why. They'll be in your way when you go to work on the wall gap (if you have one) and you'll just end up having to remove them again.

Step 11) Let's talk about the air duct again. Our plan was to run the duct slightly above the floor and to install a new vent grill in the cut out notch that we created in the toe kick but some how are measurements went haywire and there wasn't a single vent cover in the world that would fit it (seriously, we looked!) So we improvised with some decorative aluminum sheet that we found at Home Depot. Just carefully cut with tin snips, spray paint and then nail down over the duct openi
ng in the toe kick. I actually kind of wish all of our ducts looked this pretty now!

Step 12) Cut and install quarter round along the toe kick, including over the vent and along the top of all the cabinets to create a more finished look.
Step 13) Phew! Now for the final steps....caulking and painting! Take your caulk gun and caulk around all of your seams through out the built-in. Next, paint the whole unit so that everything is one nice, cohesive color. We took a cabinet door to Home Depot and had them color match. Optional but highly encouraged: add hardware.
Now it's time to enjoy your new custom looking built-in cabinets!

Can you even believe this is the same room?!


This whole project cost us approximately $500.00. It ranks up there as one of our most expensive DIY projects to date, however, hiring a carpenter would have probably cost us over a thousand dollars.
I feel this project was worth every dang penny, less expensive then admitting myself into a mental hospital over a toy clutter meltdown.

I hope if you're looking to add some function and style to one of your rooms that you're inspired to create your own beautiful built-ins!
Come hang out on Instagram or chat with me over on Facebook!
Sources:
Cabinets and cabinet pulls -Home Depot
Plain knobs-Land of Nod Outlet
Wooden chalkboard crates-Michaels
Wooden plant box- Ross
Additional sources for the rest of the room can be found here
Sharing here:
Craftberry Bush
Lamberts Lately
Play Party Pin
Creative Adobe
Connect with me: