Today I have another project from the past that I'm finally sharing the tutorial for, our playroom's DIY rustic wall pendant light fixture. This accent light really ups the charm in our camp-themed playroom and was super easy to make and super inexpensive. My favorite combo; easy and cheap!
Disclaimer: This post contains affliliate links. Interested in learning more, please read my full disclosure policy.
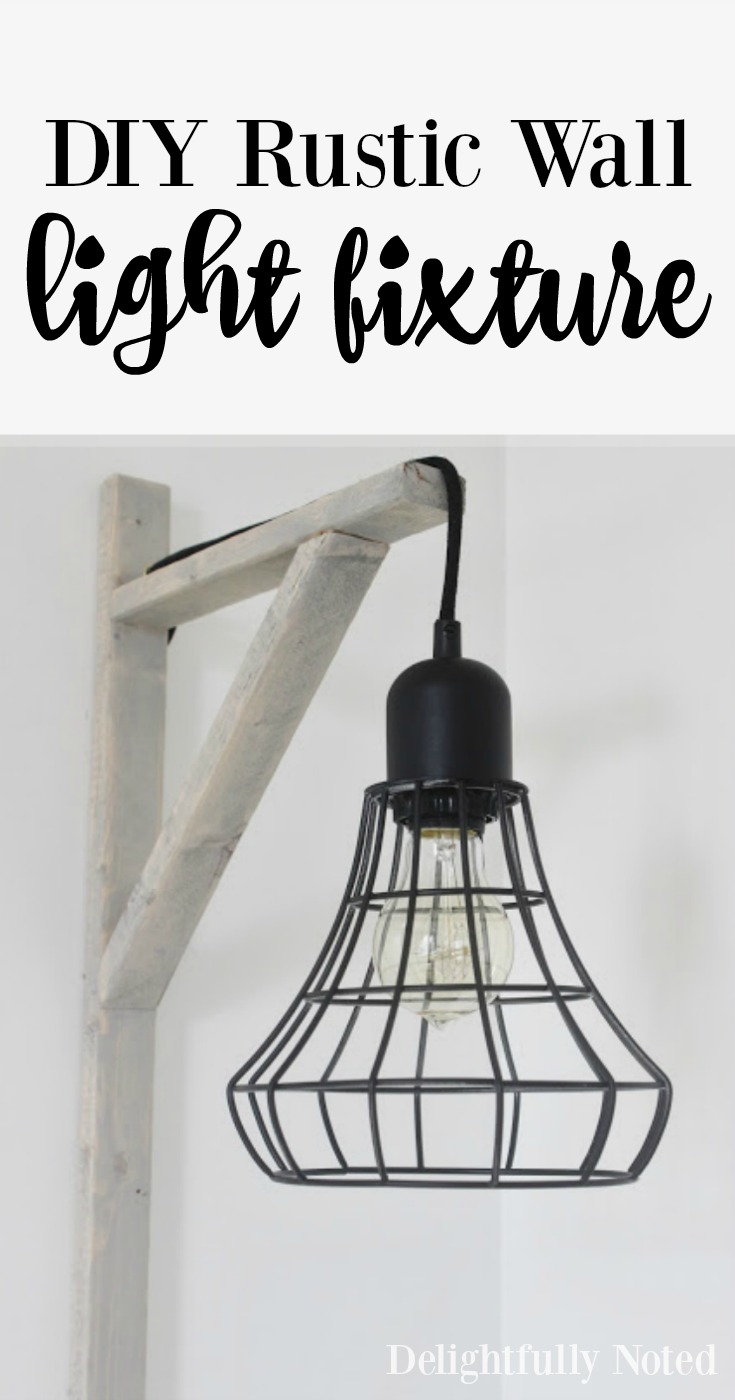
While we were planning out this playroom, I came across a few examples on Pinterest of similar wall pendant sconces but most of them only semi-covered the light's cord. This was a huge concern for me because our pendant's cord was EXTREMELY long and while I may not be "Mom of the Year", I'm quite confident long electrical cords and toddlers don't mix well. I pondered on this project for quite some time before we came to a happy, child-safe solution and am delighted with how our long wooden sconce turned out!

So if you're interested in making one of these rustic wall light sconces yourself, first things first, you've got to find yourself a plug-in light pendant. I found ours at Target and the good news is they still sell them. I really lucked out, and scored two of them deeply discounted a few summers ago and snatched them for $6.00 each. So keep an eye out for sales! A list of additional materials is listed
below.

Tools Needed
Miter saw
Drill
Nail gun
Hammer
Wood chisel
3 1/4 screws
Finishing nails
Materials Needed
(1) 1 x 2 x 8' furring strip board
Cut List
1x2 cut to 68"
1x2 cut to 10"
1x2 cut to 11.5" (cut at (2) 45 degree angles)
Once again, I'm going to apologize for not having step-by-step pics of this process. We made these a few years back and since then I've lost some pics but luckily, this is a small build so let's talk through this! First step is to take your furring strip and miter saw and to make the cuts listed above.

After you've completed your cuts, you're going to need to whip out your wood chisel and hammer and carve out a "trench" in the back of your long piece of furring strip (68") all the way from the top to the bottom of the board. This is the trick to getting your light cord to sitting flush against the wall. Let me warn you, this will probably look crappy unless your some kind of pro chiseler, but have no fear, once your light sconce is hung you won't see it!
Now it's time to assemble your wooden sconce with your screws and drill. Below is an image of which three pieces go where.

If you're going to paint or stain your light fixture, then you'll want to do that now. Once it's dry, take your pendant light and set it up on the sconce, pushing the cord into your handmade trench. Then attach the sconce to the wall with your nail gun and finishing nails.
Psst....if you find that your cord and light don't want to sit pretty on top of the sconce, you can always use a heavy-duty staple gun (just make sure the staples will be wider than the cord so you don't cut into it!) to keep it from sliding around.


Not bad for a project that cost me just $7! I love the look of Edison bulbs inside caged light pendants. It really adds a nice ambiance to the room at night. We have our outlets connected to our light switch in the playroom, so there's no need for us to crawl behind the futon to plug and unplug our light. Hallelujah!
Don't you think these would make for great bedside lighting too? Especially in rooms where you may not have space for a large nightstand and lamp.

Well, super glad to have knocked another project off of my "Still Need to Blog About" list! Hope you guys enjoyed this tutorial. I hope to be back soon with some dining room updates! In the mean time, are we friends on Instagram yet?
Sharing at these link parties.
Connect with me: