
When I was brainstorming ideas for Little B's Moon and Star birthday party I stumbled across a similar celebration over at A Beautiful Mess blog. I kept coming back to the cute moon marquee sign that they shared. So I put together our own DIY marquee art, and surprisingly it was incredibly simple!
Here's what you need:
Now for the instructions. I apologize I don't have a lot of step-by-step photos and the few that I do have are horrible quality but I was rushed trying to get this project done one evening before the party so please forgive me. I'm quite certain you can make this without a picture tutorial, it's really that easy! I believe in you.
Step 1: Start your project by tracing a large circle on your foam board and cut it out using your x-acto blade. Sidenote: I'm only 5'2 so you can only imagine how comical I looked trying to carry the world's largest foam board ever through Hobby Lobby.

As you can see, I amuse myself when I'm home alone and the kiddo is asleep.
I used a large round clock to trace out my circle. Round mirrors or the top of small tables are examples of some other items you can use. Or rock on with your bad self if you're just really good at drawing circles.

Step 2: After your circle is cut out, use that as a template to create your crescent-shaped moon on the scrap pieces of your foam board. Then cut that out with your x-acto blade.
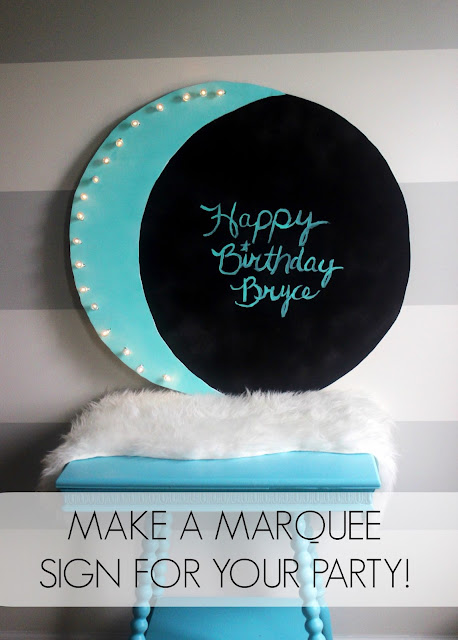
Step 3: Spraypaint the shapes the color of your choice. I used Rust-oleum's satin Aqua and flat Black.


Step 4: After the paint has dried, it's time to add the marquee lights. First, count how many bulbs you have so that you know how many holes you need to make. Then either eye it or use a ruler to plot out the distance you desire between each bulb. Once you have your placement marked, you can start making your holes. I just used a screwdriver and carefully poked the holes along the side of the crescent moon.
Step 5: Start adding your lights through the back of the moon. Use tape where needed.

Step 6: Similiar to step 5 over on A Beautiful Mess, I also added a couple pieces of scrap foam blocks to create a buffer between the moon and the back piece of the sign. The marquee light kit is battery operated ( Yay! For fire-free projects!), and the buffers allowed more space to be able to turn the light switch on and off without getting my fingers stuck between the two pieces of foam board.
Step 7: Glue the moon to the back piece and allow to dry.
Step 8: Write your message across the sign with your paint and small paintbrush or paint marker.
Here she is in all her glory! I just used a couple 3M strips to stick her to the wall.


I was pretty impressed with how it turned out. Is that weird to say about your own project? Little B on the other hand was not. After hanging this magnificant piece of fine art on the wall I asked him if he thought it looked like a moon? He paused for a second, then with a disgusted look on his face shouted "Nooooooooooo!" *Shrugs* You can't win them all.
You can check out more of the party here.
**This post contains affiliate links, which means if you decide to make a purchase through my link, I will receive a small commission for it. This doesn’t cost you anything additional. This in no way affects my opinion on these products. Thanks for supporting a craftaholic.
Sharing here:
I Gotta to Create
The Happy Housie
Lolly Jane
Connect with me:
