Welcome to day 2 of Wicked Craft Week. Today's fall project from the DIY Playbook is seriously going to make every stoop in your hood jealous!
Happy Monday Delightfully Noted readers! We’re Bridget & Casey from the DIY Playbook and we’re so, so honored to kick-off Wicked Crafted Week. On our blog, we coach our readers through the often intimidating world of crafts and home decor. The DIY Playbook is designed to give our readers the “plays”, tools, and inspiration to transform their own homes…all without breaking the bank. It’s always a great time, and we hope you’ll stop on by.
Enough talking about us, let’s get to the real reason we’re here…a fall inspired DIY project!
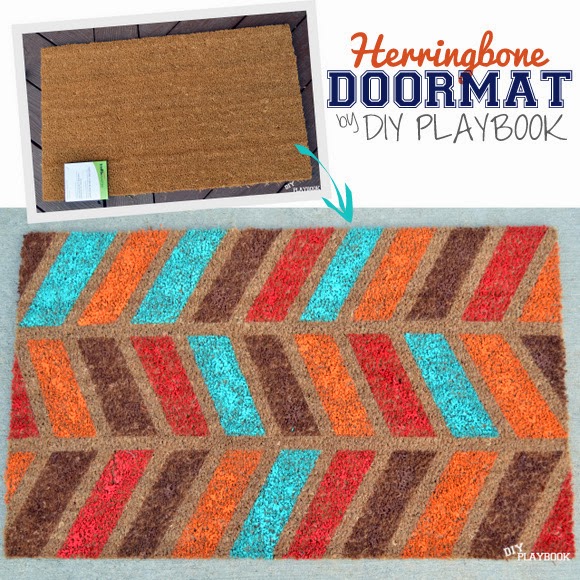
We take a cheap doormat and instantly glam it up for fall with some tape and paint.
It doesn't get any easier than that!

To get started, you'll obviously need a plain doormat. We bought ours for a whopping $8 at our local Home Depot, but I'm sure any large retailer would carry these simple slates.

You'll also need painter's tape, sponge brushes (34 cents at Michael's), and acrylic paint (3 for $1 @ Michael's). Overall, the mat & materials totaled less than $14. That's what we like to call a big league SCORE in our Playbook!

The first and most difficult part of this doormat makeover is taping the herringbone design onto the mat. But let's be real here... if us DIY Rookies handled it, we know that you can too!
Start by equally sectioning off the area with pieces of horizontal painter's tape. Our strips were 14 centimeters apart- just make sure your measurements work for your mat.

Rookie Tip: the tape may not seem to stick perfectly on the mat... that's normal! Try your best to make sure the tape is secured as much as possible to the mat, but if it doesn't seem perfect... it's okay!

Then measure across both horizontal tape lines in increments of 3 inches. Lay a new layer of tape, diagonally hitting the three inch mark that is one mark across and one mark down from the initial one. If we haven't lost you yet... you're a rock-star.
If we have lost you, just ignore me and let the pictures do the explaining... We're making this far more complicated than it needs to be. In short: tape diagonal lines across the mat evenly.

We then took a razor blade to detach the diagonal tape lines in the middle section of the rug. Once we cut them (in the middle only), we flipped each piece so it was attached to the outside tape lines just in the opposite direction. If you don't get a clean cut initially, you may have to tear some more tape and attach a fresh piece instead. We promise it gets much easier from here on out...

We randomly painted each square with our acrylic paints. We tried to come up with some sort of color pattern, but that ultimately made our brains hurt. So we just figured out the colors as we went.
It's important that you dab, dab, dab the paint rather than wiping it. Dabbing will ensure that the paint won't sneak under the painter's tape and you'll get fresh, crisp lines.

After all of the boxes were painted, we waited for the paint to dry and slowly peeled away the tape. Thanks to our precise dabbing, our lines were as crisp as a fresh sunburn after a long day at the beach. Bridget's extra pale skin knows this story all too well... trust us.

Ta-daaaa!! Feast your eyes on our festive fall doormat.

We love that this simple craft adds some fun fall color, texture, and function to the porch.


Now it's your turn, you wicked crafters you! We invite you to go create your own festive mat, and show off your style before anyone even walks into your home. Good luck, happy crafting.

Make sure to stop by to see day one's Wicked Craft Week guest.
'Eye' promise you won't regret it!
Click here.
Sharing with friends here:
Mad in Crafts
Skip to My Lou
The Gunny Sack
Sugar Bee Crafts
Frugal Girls
Connect with me: